This is a sponsored post and I was provided with complimentary products and/or compensation to facilitate this review. The opinions in this post are 100% mine. You can read my full disclosure policy here.
Graduation season is upon us. My 20th high school reunion is this summer and I have no clue how that time passed without me realizing it! I still remember my graduation day and all of the things that made it special. Those pictures of me and my friends in tears at our graduation ceremony are at the top of the list! I love that Tiny Prints graduation stationery is now so stylish and trend forward that not only do they make stunning announcements to send to friends and family, but they can easily be made into beautiful keepsakes. I have a really easy project, a graduation signature board, that you can put together in a snap and preserve your graduation card for years to come. One day that 20th reunion will roll around so hang onto your youth, people! 😉
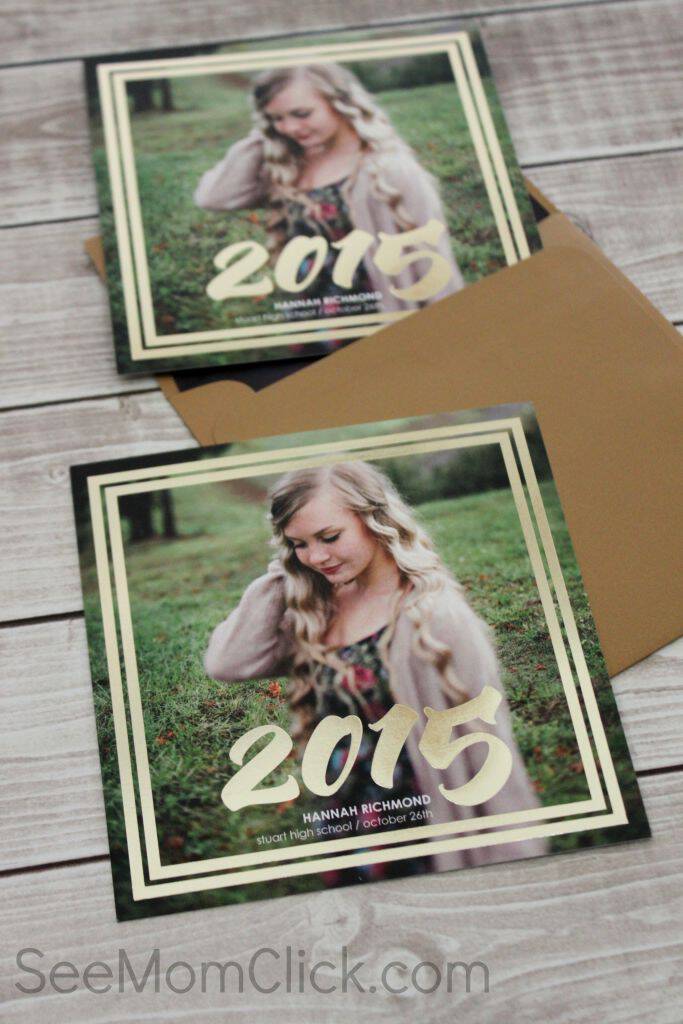
Tiny Prints has some really unique styles to choose from including foil stamped designs that stand out. This is the Gleaming Success design. Gorgeous!

This letterpress design, Stylish Student, is so classy. It’s similar in feel to this Pristine Lines design. Just a classic look. These are never going out of style!
This is another classy style, the Elegant Academia. Take notice of the beautiful lined and matching envelopes. They really dress up the entire package.
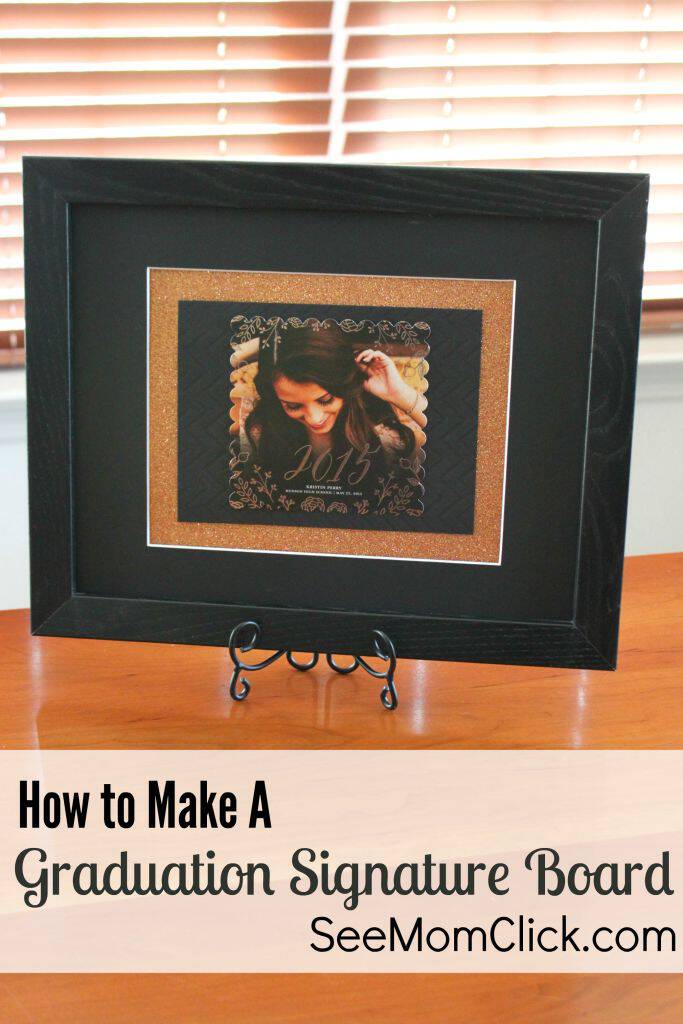
This one is my favorite, the Fantastic Graduate. That foil stamping, scalloped edge, and colored envelope just stand out to me and look stunning! So I chose this one to show you my project, a graduation signature board.
I actually used to make these for my kids’ birthday parties. A signature board is not only really easy to make, but it’s a fantastic keepsake (ours are hanging on the walls in the kids’ rooms), and it doubles as a table centerpiece. The supplies you’ll need are simple and you can find everything in a craft store:
- An 11″x14″ frame
- A matte that fits an 11″x14″ frame (Will probably have an opening for an 8″x10″ photo
- Cardstock that coordinates with your graduation card
- Tape
- Scissors or a paper cutter
For this design I chose to ‘double frame’ the graduation card because it was mostly black, and I didn’t want black on black so I broke that up with the glittery copper cardstock. The first thing to do is completely cover that opening in the photo matte by trimming down the cardstock you want as the background and just taping the edges all the way around onto the back of the matte. There’s really no need to measure this. Your cardstock is probably going to be 12″x12″ so I trimmed of just a bit (about an inch, inch and a half) and taped it on. No one will see the back so don’t fuss over it too much. 🙂
Then you’ll cut the ‘frame’ for the actual card. This part you do want to take the time to measure. I cut mine down to 6″x8″ so that I had a nice, sizable border for my glittery paper to show through. Feel free to determine your own measurements to get the look that you want. Just be careful that you don’t cut it smaller that your photo card.
Finally, center the graduation card with it’s cardstock frame on the larger piece of cardstock that’s inside the matte. Depending on what kind of paper you’ve chosen you can adhere it with tape or glue. The glittery paper is quite thick and rough, so glue works much better than tape. Then insert the photo matte with the attached cardstock and graduation card into the frame. Don’t put the glass in the frame just yet. Do that after your party. You want the matte exposed so people can sign it! Use a plate stand to prop the frame up on your table and use it as a centerpiece. A beautiful decoration and your guests won’t miss the opportunity to leave the graduate a personal message.
Find a pen that will show up on your matte. For the black matte this silver gel pen worked best. They sell a variety of colors and thicknesses in craft stores.
The messages and signatures are so fun to look back on as graduation gets farther and farther away in that rear view mirror. And when you’re busy planning that party you’ll love being able to put this signature board together in just minutes.
Head over to Tiny Prints and shop now for your beautiful graduation stationery. I’d love to see your signature board if you choose to make one as a way to preserve your cards!
amy says
That’s absolutely GORGEOUS! So much more chic than the white photo signature mats you buy at the store! Loving it…and those announcements are fabulous! #client
Michelle P. says
This is such a fun idea! One of my nieces graduates this year and this would be a fun gift for her!