This blog post is part of a paid SocialMoms and Paramount Pictures blogging program. The opinions in this post are 100% mine. You can read my full disclosure policy here.

I love going to the movies with my family. There’s just something awesome about seeing a film on the big screen and watching my kids’ get excited about new ideas. So we’re really looking forward to the upcoming release of Paramount Motion Pictures . It comes out in IMAX on November 5th and in theaters on November 7!
With our time on Earth coming to an end, a team of explorers undertakes the most important mission in human history; traveling beyond this galaxy to discover whether mankind has a future among the stars.
This all-star cast is going to rock this movie. I love Matthew McConaughey. He’s such a fantastic actor and perfect for an intense role like this one. Starring alongside him are Anne Hathaway, Jessica Chastain, Michael Caine, Bill Irwin and Ellen Burstyn. WOW, right?! Check out the trailer below for a great look at INTERSTELLAR
INTERSTELLAR Movie – Official Trailer
Doesn’t it look fantastic?! I can’t wait to see it on the big screen. Remember you can find in IMAX theaters on November 5 and in theaters everywhere on Friday November 7. Learn more about the film on the INTERSTELLAR Facebook page and Twitter feed and grab your tickets here!
Now, to gear up for this space exploration movie, I’ve created a really easy and fun (and educational!) solar system craft you can do with the kids in no time at all. Check it out below!
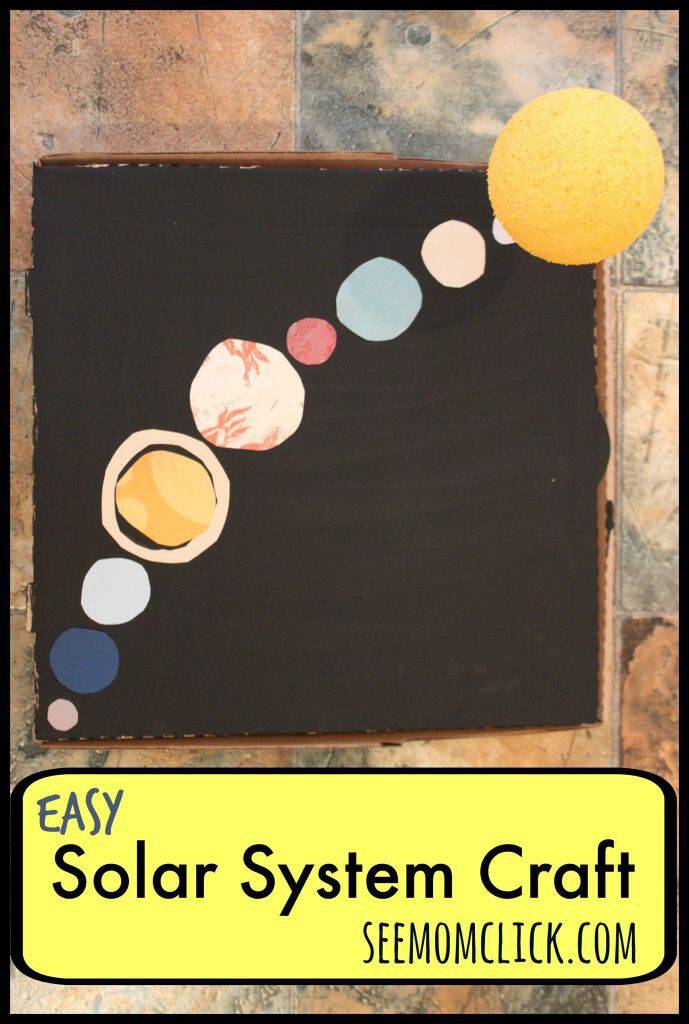
Easy Solar System Craft
Supplies:
- Cardboard box (I used a pizza box)
- Black and yellow paint (I used acrylic)
- Paint brush (I used a foam brush)
- One Styrofoam ball
- One wooden skewer
- Cardstock, various colors
- Scissors
- Glue

Directions:
- Push the pointed end of the wooden skewer through to the center of the styrofoam ball. Use the paint brush and yellow paint to paint it to look like the sun. Place it in a deep cup or glass to dry while you move on to the next step.
- Use a paint brush and black paint to paint the surface of your cardboard box black like the night sky. Set it aside to dry while you cut out the planets.
- Use various colors of cardstock to cut out each of the planets. I debated putting Pluto on there but I’m a child of the 80s so I had to include it. And recent scientific debate is leaning toward once again including Pluto as a planet. I’ll let you decide! I used this image to help me determine the approximate size and color of each planet.
- Once the black paint is dry on your cardboard surface, position your sun in place. You may need to cut off a portion of your skewer if it’s too long (this is going to depend on the depth of your box). Push the skewer through the box in one corner. If you can’t get it to go through, use a nail to create a hole and then place the skewer in the hole.
- Arrange the planets in order: Mercury, Venus, Earth, Mars, Jupiter, Saturn, Uranus, Neptune, Pluto. Once you have them lined up how you want them (and I did them all in a row but you can slide them side to side as long as you keep the same order from the sun), use the glue to attach them to your cardboard box.
Some other ideas to enhance the project:
- Add lines of orbit. Silver paint would be cool for this!
- Add stars in the sky
- Label the planets with their names.
- Add some facts about each planet: Size, distance from the sun, etc.
Leave a Reply